We heard you. It’s here. In Silent Sifter 2.8, at popular request, we’ve added support for removing original files after sifting is complete.

We heard you in app store reviews, in trouble tickets, on twitter, and on our feedback site. One person even told us about it in person. Another person sent us a message on friendster. Ok, we were kidding about that last one. But nevertheless, the feedback was overwhelming, thank all of you that brought this to our attention.
At long last, with Silent Sifter 2.8 you are able to delete the original files out of the input folder after they have been successfully sifted.
Overview

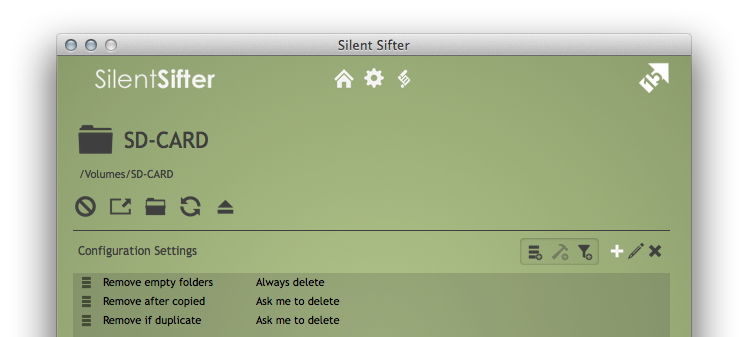
For each camera or folder input location you configure, you can set any combination of three new settings. Each setting has an array of options that you can choose from, that will guide Silent Sifter’s treatment of the original files in the input location (or lack thereof).
All of the options are listed below:
| Setting | Options |
|---|---|
| Remove after copied | Never Ask me to move to _Sifted folder Always move to _Sifted folder Ask me to delete Always delete |
| Remove if duplicate | Never Ask me to move to _Sifted folder Always move to _Sifted folder Ask me to delete Always delete |
| Remove empty folders | Never Always delete |
You can choose to have Silent Sifter move Copied files, Duplicates, both, or none. You can choose to have Silent Sifter automatically take action, or to ask you first. You can choose to have Silent Sifter delete the files, or to move them into the _Sifted folder.
Remove After Copied
This setting determines what Silent Sifter does with original input files, if those input files were copied to all of the output locations in a given sift.
That means that if you sift one input into two outputs, and a file is only copied to one of the outputs, then that file will not be removed from the input.
Keep in mind, however, that if you were to disable one of the outputs, and then perform the same sift, and the file was copied to the same output, it would be removed from the input because the output that failed was not included in the sift.
We’ve also implemented copy validation, so even though OSX says a file was copied successfully, we do a little double checking before we agree. Specifically, we check a few attributes on both the input file and the output file, to make sure it looks the same before we call the files ‘Copied’. If the attributes don’t match, we call it a failure, and it would not be removed. Our validation is good, but not bulletproof – it will detect things like partial copies, for example.
Remove if Duplicate
Similarly, the Remove if Duplicate setting determines what Silent Sifter dos with original input files, if those files were found to be a duplicate in one or more outputs.
One or more? What does that mean?
We categorize an input as the lowest level possible, depending on how that input was handled across multiple outputs. For example, if a file was sifted to three outputs, and it was copied to one output, and duplicates were found in the other two outputs, it would be categorized as a ‘Duplicate’ for the purpose of determining how to handle the original input file. This means that this file would use the ‘Remove if Duplicate’ setting to determine how it was handled after a sift.
Similarly, if the same file was copied to one output, and filtered in a second output, and failed to copy in a third output, it would be categorized as ‘Failed’, and would not be removed regardless of whether it was copied to one of the outputs.
The same caveat applies here as with ‘remove after copied’; namely, if you were to disable the two outputs (filtered,failed) in the above example, and then perform the same sift, the file would be marked as ‘Copied’, and potentially removed based on your ‘remove after copied’ setting.
Another way to look at this is that, if a file is either copied to or identified as a duplicate in ALL of the outputs in the CURRENT sift, then it could be removed if your preferences allow it. If a file is filtered, skipped, fails to copy, or any other categorization in ANY of the outputs in the CURRENT sift, then it will never be removed.
Never
Never means never.
Silent Sifter will not touch the original files. This is the default behavior, unless you override it with your own setting. It is also how all users of Silent Sifter 2.7 and earlier will continue to work, until they override the setting.
Ask vs. Always

For both the _Sifted folder and the delete options, you can choose to have Silent Sifter always remove the files, or ask you first.
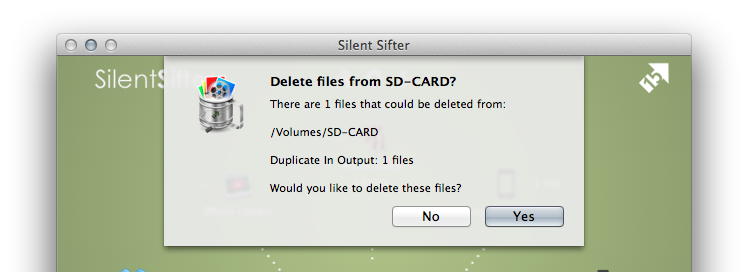
Ask means that Silent Sifter will ask you whether you want to remove the files, once the sift operation is done. You will see a summary of how many files will be removed, and how they were categorized (duplicate or copied), and given a choice.
If you say ‘No’, then the files will remain in their original location.
If you tell it to ask you for every input, it will ask you for every input. If you have a lot of inputs, it might be a lot of questions, but then…you told us to ask 🙂
If you have it set to ‘Ask’ and AutoSift occurs, it won’t remove the files, and it won’t ask – after all, you are probably not around. Ask only happens if you manually start sift.
Always means, well always. AutoSifted files will be removed. Silent Sifter will do this in the background, and not bother asking you about it.
The _Sifted Folder

What is this _Sifted folder?
It’s a middle ground between leaving the files alone, and deleting them altogether. Think of it as a ‘trust but verify’. You can have Silent Sifter move your input files into a _Sifted folder, and then you can verify that the files were indeed sifted to your satisfaction. Once you have done so, you can happily delete the files in the _Sifted folder.
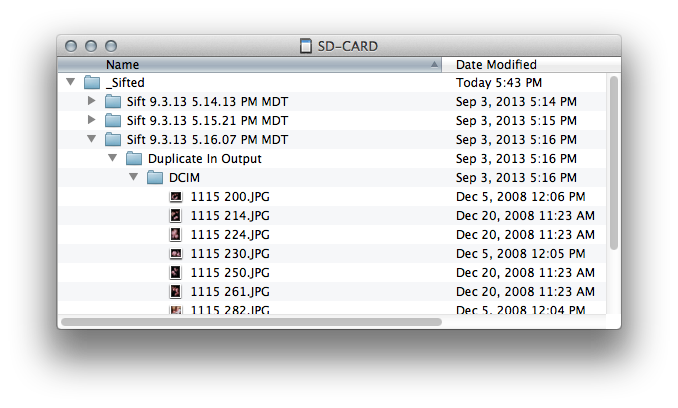
Here’s how it works. If you choose to have files moved to the _Sifted folder after sifting, then a new folder, called ‘_Sifted’, will be created in your input location. This folder will hold all files that are moved after a sift operation.
Each sift operation will have it’s own date and timestamped folder within _Sifted, to show you what files were sifted.
Within each sift operation’s folder, files will be grouped by file status (i.e. ‘Copied’, ‘Duplicate In Output’)
Within the _Sifted folder structure (_Sifted/Sift operation/File Status), the files will retain their original file structure.
Note that all files in the _Sifted folder are ignored by Silent Sifter during the sifting process.
You are free to delete the _Sifted folder or it’s contents at any time. Silent Sifter will recreate the folders on the next sift if necessary.
Deleting Files
Deleting the files should really be called ‘Deleting’ the files, because in most cases they will actually be moved to the recycling bin. But we call it Deleting because we want you to take it seriously; these photos and videos will be either deleted or moved to the trash, which is darn close to being gone forever. If you are in doubt, don’t use this setting.
If you chose to have files deleted after sifting, then Silent Sifter will attempt to move the files to the recycle bin.
Files will be moved to the recycle bin if possible, but in some cases within OSX this is not possible, and the files may be immediately deleted. One example of this is if the input location is contained on external media that does not support a recycle bin.
Files are grouped into a timestamped sift folder, and then that folder is moved to the recycle bin.
As always with OSX, the disk space is not available until you empty the recycle bin.
Using with Camera Inputs
Camera inputs allow you to remove files after sifting as well, but have a few slight difference in how they behave compared to Folders.
One difference is with the _Sifted folder. If you choose to have files moved to the _Sifted folder for a camera input, the _Sifted folder will be created in the camera’s import folder within Silent Sifter’s Temp folders. You can access the _Sifted folder for the camera by opening the advanced configuration screen for the camera, and pressing the ‘Open _Sifted’ button in the toolbar, which will open a finder window at the _Sifted folder for the camera. You can access all of the camera _Sifted folders by opening the Temp directory itself from the Silent Sifter Help menu at the top of the screen.
Another difference is that if you choose to use the _Sifted folder, then files will be copied to the _Sifted folder, and the files will remain on the camera device itself.
the final difference is that if you choose to delete the files from the camera, then the files will be deleted from the camera, and also moved to the recycle bin (if possible).
Removing Empty Folders
What about this remove empty folders thing? We intentionally left it for last, so as not to confuse you further. But it’s an important part, so here it is:
Input folders and cameras have a setting called ‘Remove empty folders’ which tells Silent Sifter how to handle empty folders in the input location after files are removed from the input location
Note that only completely empty folders will be removed; empty folders will not be removed if there are hidden files in the folder. The only hidden file that is ignored is .DS_Store, which is created by OSX automatically.
Note that this option is only applied after removal of sifted files from the input. If you no files are removed from the input, then all empty folders will be left intact, even if the setting is ‘Always delete’.
Empty folders are moved to the recycle bin if possible.
In Summary
Now you can automatically scrub your input folders and cameras when you sift, while also being sure that files that are filtered or fail to copy are safe.
It’s important that you take the time to understand these options before jumping in and using them. We recommend that you start with Ask to Move, and move up to Always Move, and so on as you gain confidence.
If you have questions or comments, we are happy to help, drop a comment below or give us feedback on our new Support page.